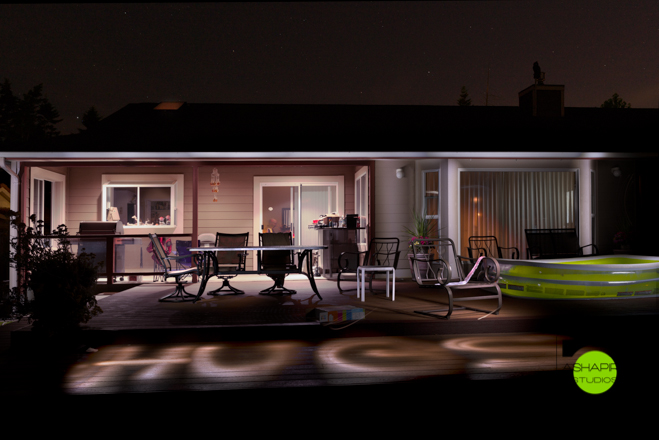
A camera sees light. Where you have exposed light, the camera will capture it. Where there is no light, nothing appears in the photo. Based on that, given the right environment, you can control what your camera sees and what it doesn’t using a light source that you control, known as “Light Painting.”
The idea is to start with darkness. If a room (or wherever you are) is dark enough, it doesn’t matter how long your shutter is open or what other setting you use; you won’t get a photo. But if you use a flashlight or some other directional light, you can shine onto the ‘thing’ you want to ‘see’ in the photo. Do this several times in a scene, then layer the different exposures in Photoshop and you’re done – you have a Light Painting!
Well, not quite. Before you start – you’ll need a camera where you can control the exposure, a tripod and a flashlight. A remote camera trigger is important, but not absolutely necessary. Depending on how big my scene is, it’s also helpful to have a friend who can fire the camera (so you don’t have to keep going back to it with timer mode). Let’s break down the next steps:
- Pick Your Scene. Decide what you want to take a picture of. Do any styling, cleaning or setting that you need to do.
- Take A Test Shot. Look at the picture you took and see if you like the composition, if any styling needs to be changed, if you need to move your camera, etc. Take a few if you need to. Once you get to step 5 you won’t be able to move your camera, so get it right now.
- Decide What’s Important. Remember – what you shine your light on will end up in your photo and what you don’t shine light on won’t, so take a look around and figure out what you want to include in the photo and what can stay black.
- Take Some Light Tests. You want enough time to ‘brighten up’ the things you want, while keeping everything else dark. Light – except where you want it – is your enemy. If I’m shooting outside at night, I like to use ISO 200, F/8 and 5 second exposures. That will keep things dark enough in the scene while allowing me to shine the flashlight around to light things up. Once you figure out what those settings are, write them down. This is also the time to worry about your focus, depth of field, white balance, etc – you don’t want your camera to change anything – lock it all down.
- Take Your Base Shot. This shot, for me, is the exposure for all the stuff I can’t control. Sky? Buildings in the background? Whatever it is, I take a shot underexposed 1/3 of a stop darker than the brightest thing I want in my photo. I then take another shot as dark as I can while still being able to see some bit of detail. This gives me 2 baseline shots that I can paint in when I get to Photoshop, if I need to.
- Light Paint! Make your exposures. Paint your scene. Check your screen as you go if you want, but don’t move the camera – not at all.
- Import the Photos. Use your favorite import and RAW converter to make any big adjustments you need/want. I like Lightroom, but ACR works just fine.
- Layer the Photos. Take the images into Photoshop as separate layers in the same file and change the blending mode of all of them to ‘Lighten’ except for the dark base layer. Put layer masks on each layer and paint in the area that you light painted. This will make sure that if there was any light spill – glare in windows, you caught your feet or something else you didn’t intend – that it won’t be in the final composite.
- Add Any Adjustments. Something too bright or too dark? Add adjustment layers as needed to touch stuff up. This is also a good time to do any spot healing needed.
- Output! Once you’re happy, save the photo! You’re done!
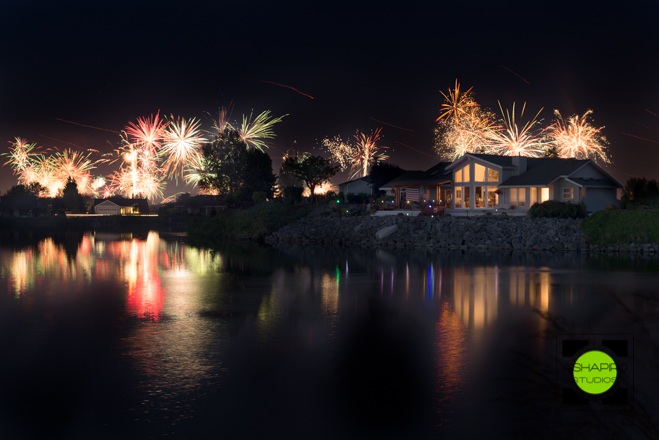
Over the 4th of July holiday weekend I had a chance to do an outside light painting.
Lots of fireworks in the area, so I did a little composite.

They lasted well into the evening so was able to get a darker sky one too.
The morning light coming through the east-facing windows made for some great food photography.

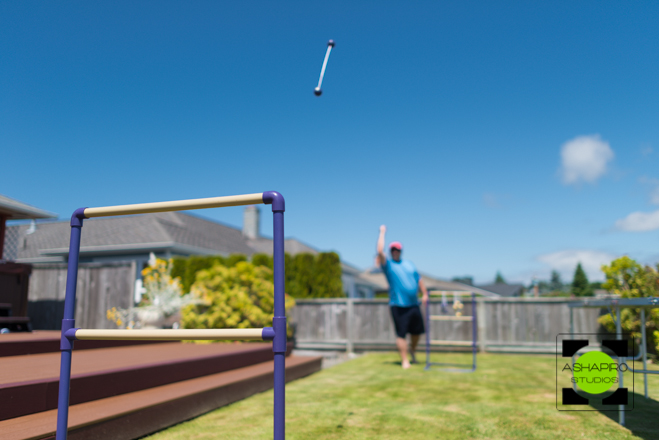
Lots of lawn games over the weekend too.