
Adobe Lightroom is an essential part of my workflow. I’ve been using it since version 2 and absolutely love it. It completely replaces ACR and is often the only post processing I do to a photo. A couple weeks ago, Adobe announced that the Lightroom 5 Beta is available for download and addressed some of the updates. What do I think? Will I upgrade?![]()
A little housekeeping: It was about 10 weeks ago that Adobe updated Lightroom to V4.4. As with any incremental updates, there weren’t a ton of changes – mostly support for newer cameras/lenses/profiles. You can read about the 4.4 release here. I’m running LR4.4 and will be comparing it to LR5.0 Beta. I also run Creative Cloud with Photoshop CS6 among other things. A word of caution if you do download the Beta: Since the product is pre-release, there are no guarantees. Do not use it for production work and don’t rely on it for anything crucial. In my comparison I worked with the same RAW files – they were for some personal, fun stuff that I’d already outputted the final JPGs and I made duplicates of the original RAW files to work with in the Beta. I’ll add that I’m assuming you have at least a familiarity with Lightroom; my goal here is not to teach you how to use it. Also – the debate continues on Lightroom vs Apple’s Aperture; I’ve used both and prefer Lightroom. OK, Let’s get to it – the Lightroom 5 Beta!
Starting-Up and Importing
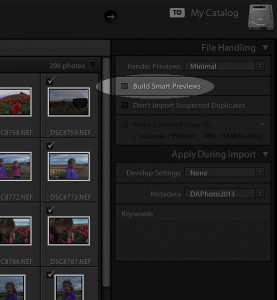
Opening Lightroom hasn’t changed. I keep my libraries separated by job, so on open I’m given the same window asking which library I’d like to open, or if I’d like to create a new one. After creating a new catalog, the import options are the same; in the Library module, I can select ‘Import’ from the lower left corner of the application window, I can choose ‘Import Photos and Video…’ from the File menu or I can drag-and-drop files into the Library import window directly. The import window is where we see the first change – a new option to “Build Smart Previews” on import, an option you’re given no matter which type of import you perform (copy, move or add). I’ll dig deeper into this option later; for now, you’re making the decision whether or not to check this box based on 2 things – First, where does your library live, and Second – how much free space do you have on your drive? I keep my current projects on an external hard-drive that has plenty of room, and I take it with me everywhere, so I’m going to leave this box unchecked. More later.
Modules
Lightroom 5 keeps the same module structure as LR4 – Library, Develop, Map, Book, Slideshow, Print and Web.![]()
Library
The Library module hasn’t, at first glance, changed at all. The only change I could find was a reference to ‘Original Image’ directly under the histogram, which has to do with the ‘Smart Previews’ function which, again, I’ll get to later.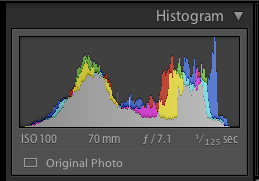
Develop
This is where most of the changes have happened, and all of the ones that matter to me in my business. The adjustment drop-downs are still the same, tho some tools and adjustments have seen some major upgrades.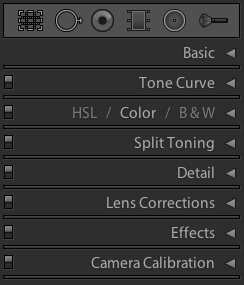
In the Lens Correction adjustment pane, LR5 introduces a new workflow by adding a ‘basic’ correction window. Both ‘Enable Profile Corrections’ and ‘Remove Chromatic Aberrations’ now have shortcuts here, tho they also live in the ‘Profile’ and ‘Color’ correction windows as well. Enabling this option in either location does the same thing. There’s a new feature in the Basic adjustments called ‘Upright.’ Upright automatically, using behind-the-scenes math, adjusts your image to straighten or adjust for perspective shifts, or keystoning. Keystoning is what happens when, for example, you take a photo of a building, looking up at it. Since your camera and the building aren’t parallel, the building in the photo will look like it’s falling away from you. Adjusting for this will give your photos a more real-world, natural look, and can now be done in one click from this panel using the ‘Vertical’ button. If your hand was a little unsteady and your camera was tilted to the side when you took the photo, the ‘Level’ option will automatically straighten your photo. Both are very cool and smart tools. In the same pane, Manual corrections adds an ‘Aspect’ slider which expands or compresses an image horizontally/vertically, which could be useful as an effect, but I don’t see using it in every-day editing.

The other changes that will really effect my workflow in the Develop module (and really, application-wide) come in the tool palate.
First, the Healing Brush. In version 4 (and previous to that), Lightroom did a nice job with spot removal. If there was a dust spot on the sensor, or a stray glare in the image, I was able to click, size and reposition the healing brush to quickly and easily remove those spots, but things like telephone poles/wires or larger objects either meant I was taking the photo to Photoshop, or using a series of small healing brush spot removal clicks to remove the unwanted element. Now in LR5, by holding down the mouse button as I drag, I’m able to ‘paint’ an area to heal. Just as before, I’m then able to move or resize the area that the healing is drawing from, making the tool act even more like Photoshops Clone/Stamp tool. At the very least, this will save me a round-trip to/from Photoshop. LR5 now also adds a new way to see any spots in an image. When using the healing brush, there’s a new option at the bottom of the viewer window to ‘Visualize Spots.’ This option gives a look very similar to Filter>Stylize>Find Edges then inverting the layer in Photoshop. It shows contrasting edges that might be dust spots that you’re then able to make a decision on. Keyboard shortcut ‘A’ helps you bounce back and forth between this view and ‘normal.’
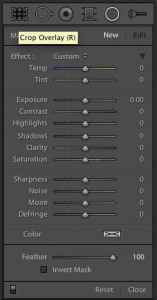
Next is the addition of a brand new tool – the Radial Filter. Much like the Graduated Filter, the Radial Filter allows you to adjust a specific area of an image for a bunch of corrections including White Balance, Exposure, Saturation, Noise Reduction and more. Where I think I’ll use this tool most is in creative vignettes. Vignettes occur naturally in optics; usually a darkening of the outer edges of an image. I add a vignette to many of my images as a tool to get the viewer’s eye to focus on a particular area of an image (sometimes using exposure, sometimes using desaturate). Doing this in LR4 was possible in 3 ways: you could either use the ‘Post-Crop Vignette’ in the Effects palate, you could use a series of graduated filters around an image or you could brush in an adjustment. The first only effected the image from the center out, the second would give you overlapped areas that would have double the effect and the third was difficult to make into a nice, circle shape which made the effect look a little wonky. With the new Radial Filter, it’s easy to add a good looking, creative vignette to any image. The radial doesn’t need to be a perfect circle; it can be oval and turned any direction for elements that run through an image (like a river, maybe). One important note is that where the brush tool selects an area to effect, the radial gradient selects an area to protect and you effect the area outside the circle.
One hiccup I found: When using the Adjustment Brush I like to use the mask overlay, which shows up as a red mask over the effected area, to make sure I’m getting everything I want and excluding unwanted areas of an adjustment area. LR5 keeps this option available, but by turning on the overlay area then continuing to apply the brush, the mask disappears. You have to turn off the mask overlay then turn it back on to see the mask. Doesn’t effect the image but does slow down the process a bit.
Map
The map module hasn’t changed much; just the addition of a Direction tag in the metadata; the direction the camera was pointing. If your camera is capable of geolocation with direction, this may come in useful. I don’t use this feature.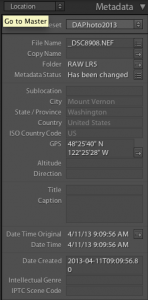
Book
The Book module has seen a couple changes. The first one you notice is renaming the ‘Caption’ menu to ‘Text,’ tho the functionality hasn’t changed. In the Book Settings menu, you’re still given the options for Blurb, JPG and PDF output (in case you don’t want to use Blurb). If you do choose Blurb, you now have a new paper type option – Standard. We were limited to premium paper types before, which are much nicer, but are also more expensive. Standard paper saves almost 25% in some cases on cost. The release notes on LR5 talk about being able to edit templates, but I can’t find any difference in how the templates perform. In future versions, I’d love to see an option to export a book as an ePub or other eBook format – maybe even as a dedicated app?
Slideshow
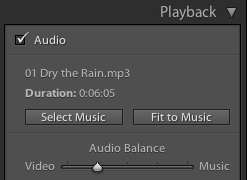
I’ve always enjoyed creating slideshows, especially from personal vacations. Adobe has really been helping fusion photographers – those shooting both still and video – in Lightroom for a while. Tho there are still no editing tools, Lightroom has been able to import and adjust metadata for videos since the original release of LR4. Now with LR5, you’re able to incorporate video elements into your slideshows. This really helps visual storytellers and is a good step in the right direction for Lightroom, tho the rest of the module is unchanged.
The only change in the Print module is in how the print buttons are named. Where your options used to be “Print One” and “Print…,” you now have “Print” and “Printer…” They perform exactly the same tasks as they used to.![]()
Web
The Web module hasn’t changed at all.
Smart Previews and Offline Editing
The largest global change that was made to Lightroom for version 5, and the thing that might make the go/no-go decision for some on purchasing LR5 is the new ability to edit photos while away from your source files. As most regular users and photo professionals will tell you, it’s not a good idea to keep the photos you’re working with on the same drive as your system, but many keep the libraries that control the source files on their system drive. I do not, so the point is somewhat moot to me, but I’ll walk you through it.
Lets say you, like many other, are either a mobile professional (maybe a real estate agent) or you keep a virtual office (like many creative professionals). You took some pictures on your recent vacation and you loaded all of them onto a large, external hard-drive you keep at home. You take the laptop with you, that has Lightroom on it, and you want to edit (or even look through) those vacation photos while you’re sitting at a coffee shop between meetings. In previous versions of Lightroom you were able to do this, but you had very limited capabilities. You could look at the photos but they were often poor quality and pixelated, and there was no editing to be done (except for moving between collections and adjusting metadata). In the new Beta, LR5 creates a new version of the photo that both looks great and can be edited. When you get back to your main catalog, LR syncs up the changes so you can output for print, web, books or whatever you like.
I keep everything I’m currently working with, including all of my Lightroom Libraries, on an external drive. All of those files are backed up on a RAID back at the studio, but the drive is small enough that I carry it with me. For a user that’s trying to pare down a bit – size, weight, number of items in the bag, etc – this could be a huge step.
Wishful Thinking
There are 3 items 4 items that I continue to wait for with Lightroom – 3 things 4 things that would make my workflow and productivity even faster and easier:
- Most important to me, as a Nikon shooter, is the ability to see the LiveView image in the Tethered Capture screen. For product photography, I’d love to be able to frame a shot and pre-visualize an exposure based on the large screen. I believe it’s possible with Canon but not with Nikon – yet.
- The ability to composite images. One of the most common round-trips for me is to take an image out of Lightroom to composite in a sky or some other element. The concept of layers is very Photoshop, but the PS tool is overly-powerful for my needs here. I don’t necessarily need to adjust a blend mode or transparency (tho, that’d be nice in LR too), but just the ability to composite one image over another with a feathered edge would be great.
- The ability to overlay simple text, graphics or textures on a photo-by-photo basis. The book module comes close (at least for text), but I don’t want to have to output from the book module. Check out an app for iOS called Typic. While I think that app in particular will become dated very quickly, the concept is strong – the ability to overlay simple text on a photo. The ability to add graphic elements (especially frames like those found in Snapseed, Camera+ and even Instagram) is also obviously missing from LR, as are texture overlays (which offer a great creative twist).
- UPDATE – The ability to switch between libraries without shutting down the program. As it sits now, to go from one library to another, the whole program has to close and reopen.
Conclusion
Overall, Lightroom 5 has some nice changes that take the usability up a notch. I’m not sure if the new healing brush and radial filter, along with the other small changes will be enough to make me upgrade, as the Offline Editing function isn’t important to me, but it is a very compelling reason for someone looking to be more mobile and move even faster. You can learn more about the changes in Adobe Lightroom 5 and download the Beta version from this link. Enjoy!